
22 January 2024
By Sam Karp
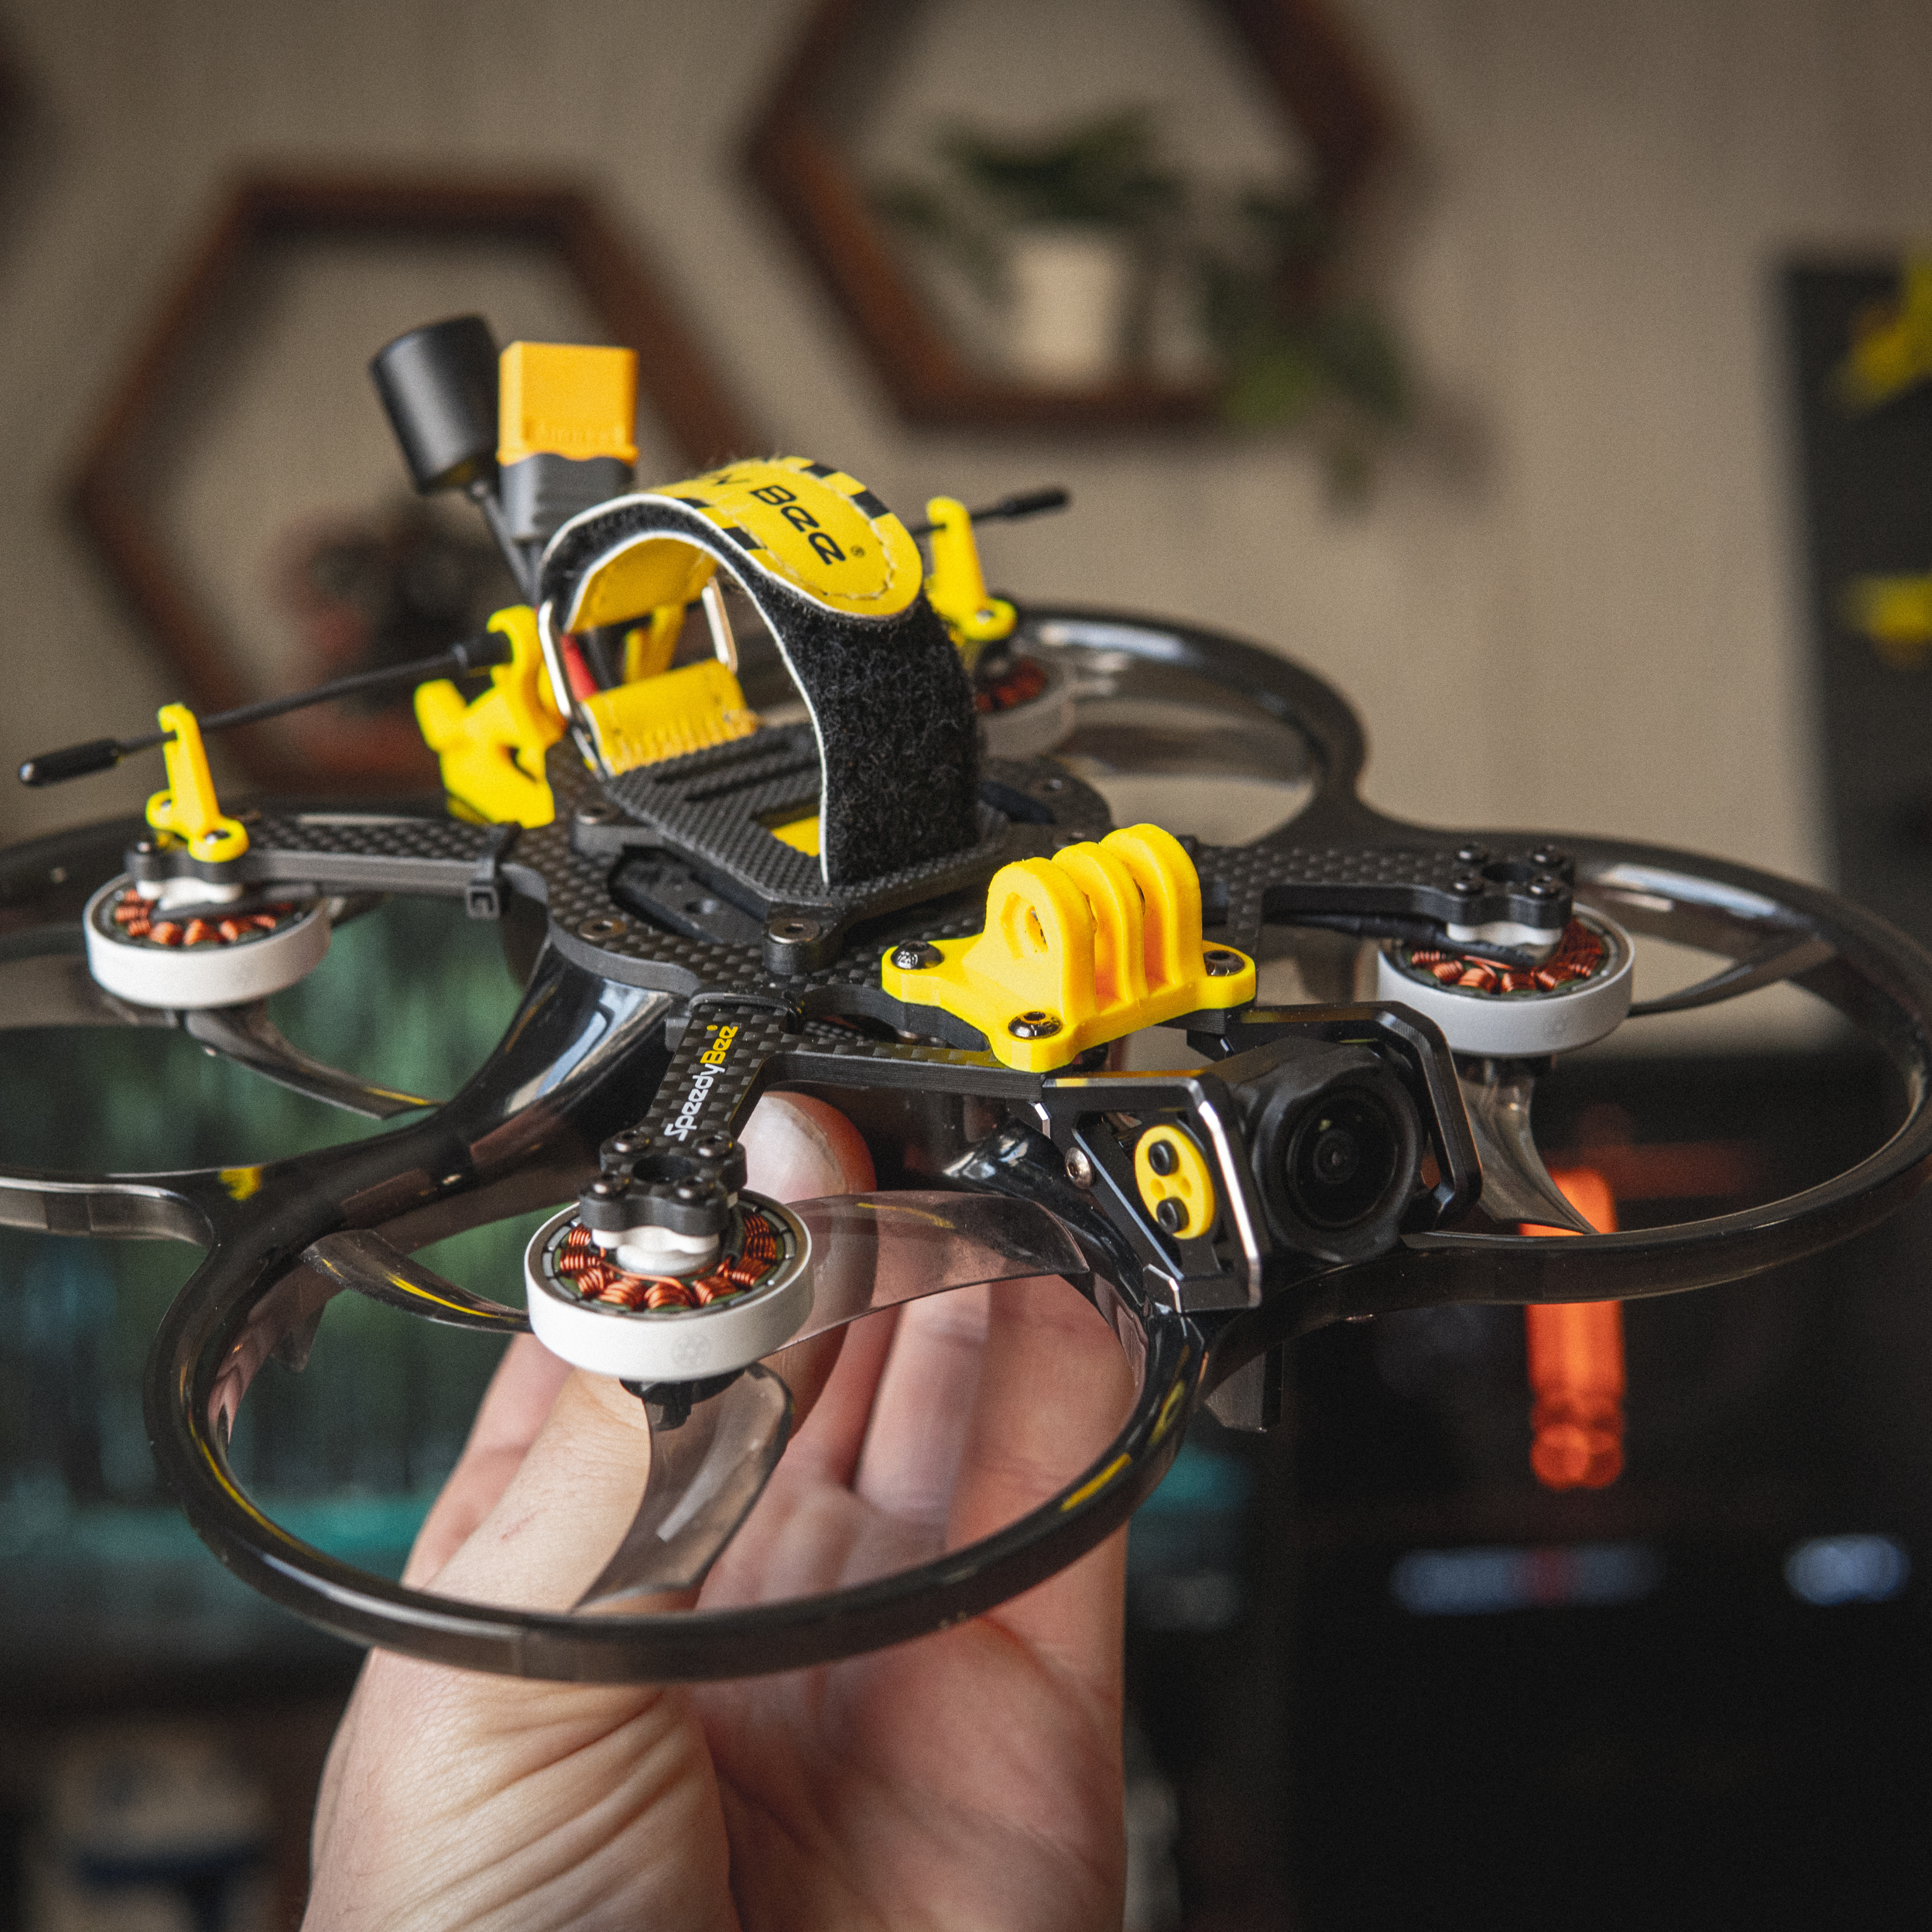
I’ve been in the market for a new cinewhoop ever since my trusty Shendrones Squirt v2 finally bit the dust after 4 years of being an absolute workhorse. Cinewhoops are what I end up flying 9 out of 10 times during commercial shoots and as much as I love my 5 inch quads, they just don’t see nearly as much professional use as my cinewhoop. So, I need to build a new one, and it needs to be good.
Originally I was planning a build around the Cinelog 35v2, but as soon as I saw that SpeedyBee had just launched their own 3.5inch cinewhoop platform called “The Bee35” I immediately knew that I had to give it a try. SpeedyBee has already become one of my favorite brands in FPV due to their incredible F405 and F7 flight controllers, but I haven’t gotten the chance to check out any of their frames. Until now that is, and spoiler alert, I’m very impressed with what I’ve seen so far. Let's take a deeper dive into what I like, and dislike about the Bee35.
Components
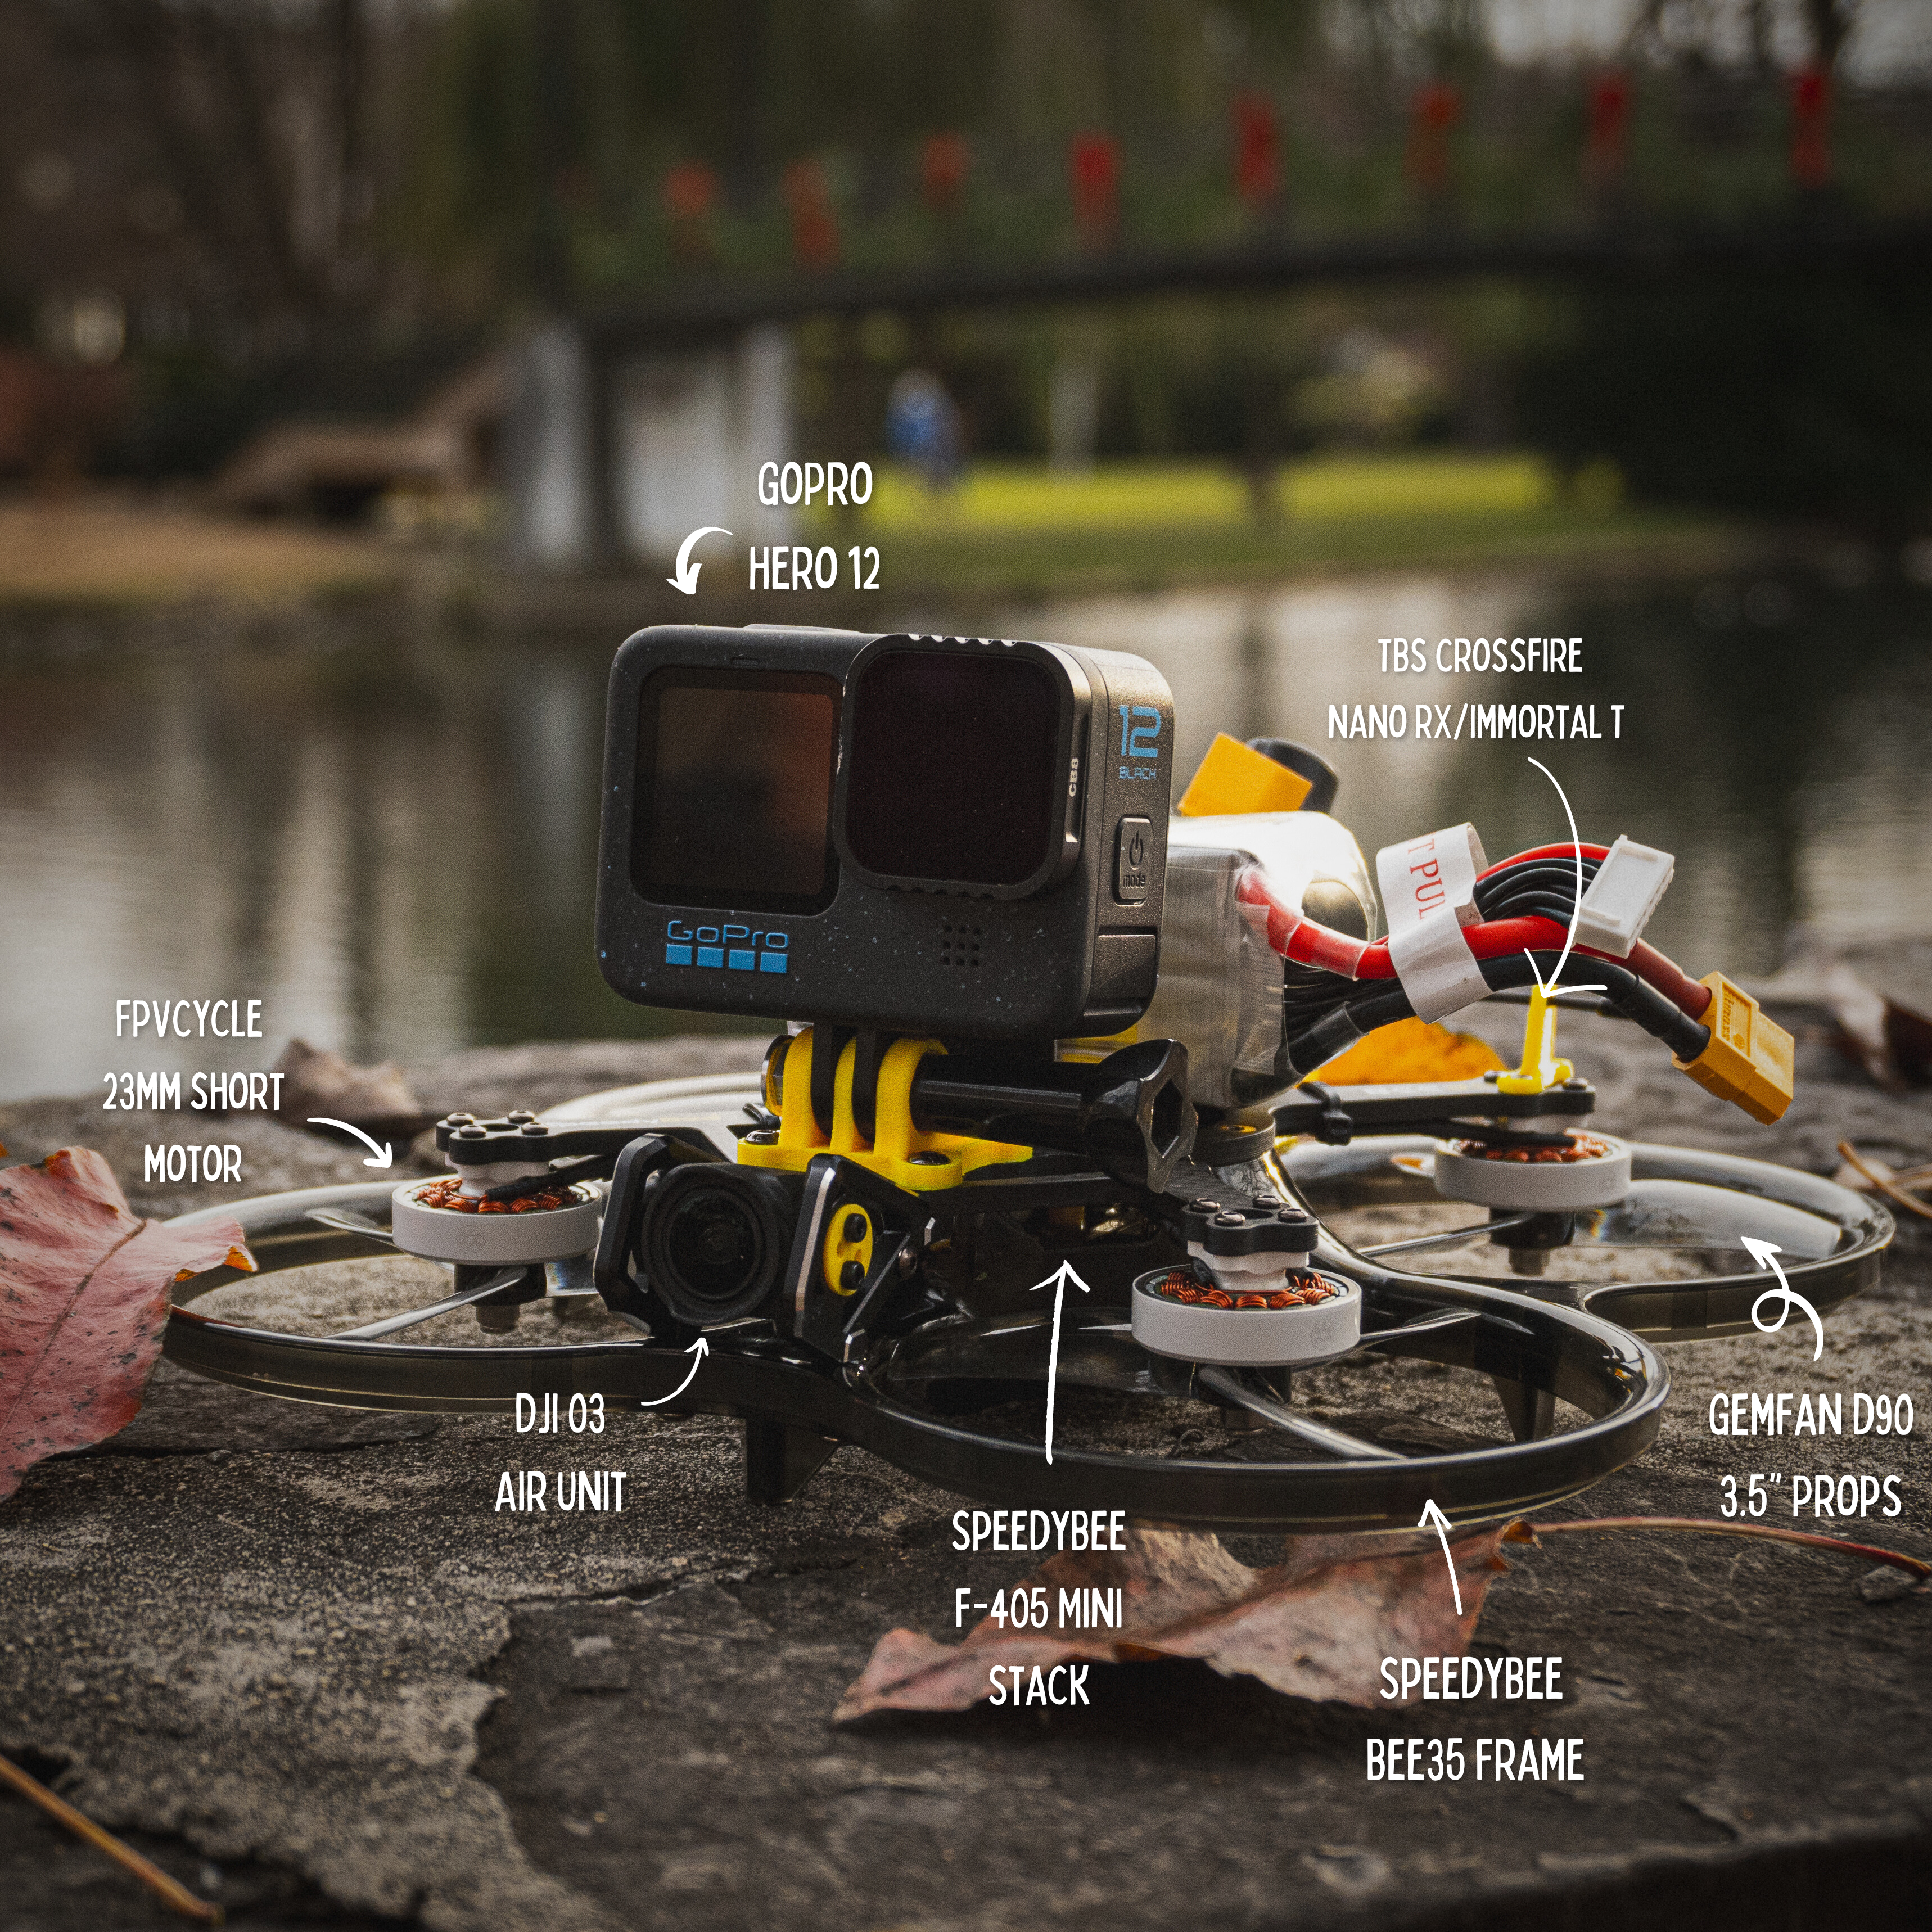
Here’s a list of all the parts I used for this build along with the Specifications for the Bee35 Frame:
• Frame - Bee35 Pro (Pro version is required if you want to use the DJI 03 Air unit)
• FC/ESC Stack - SpeedyBee F405 Mini
• Motors - FPV Cycle 23mm Short Motor 2350Kv
• VTX - DJI 03 Air Unit
• RX - TBS Crosfire Nano with Immortal T antenna
• Props - Gemfan D90
• Battery - 1200mAh 6s Tattu R-Line
Specificiations
• Wheelbase - 153mm
• Top Plate Thickness - 3.5mm
• Bottom Plate Thickness - 2mm
• Camera Mounting Distance - 19/20mm
• ESC/Motor Mounting Height - 24mm
• Flight Stack Mounting Holes - 20x20/25.5x25.5/30.5x30.5mm
• Video Transmitter Mounting Holes - 20x20/25.5x25.5mm
• Propeller Size - 90mm
• Motor Mounting Holes - 12x12mm
• Weight - 138g
• CNC Heat Sink - 15g
• Camera Gimbal (Optional Add-on)- 28g
• Recommended Motor - 1806/2004/2006
• Recommended Kv - 4S/2500-3500Kv, 6S/1800-2300Kv
• Recommended Battery - 900-1500mAh 4S/6S
Design and Build Quality
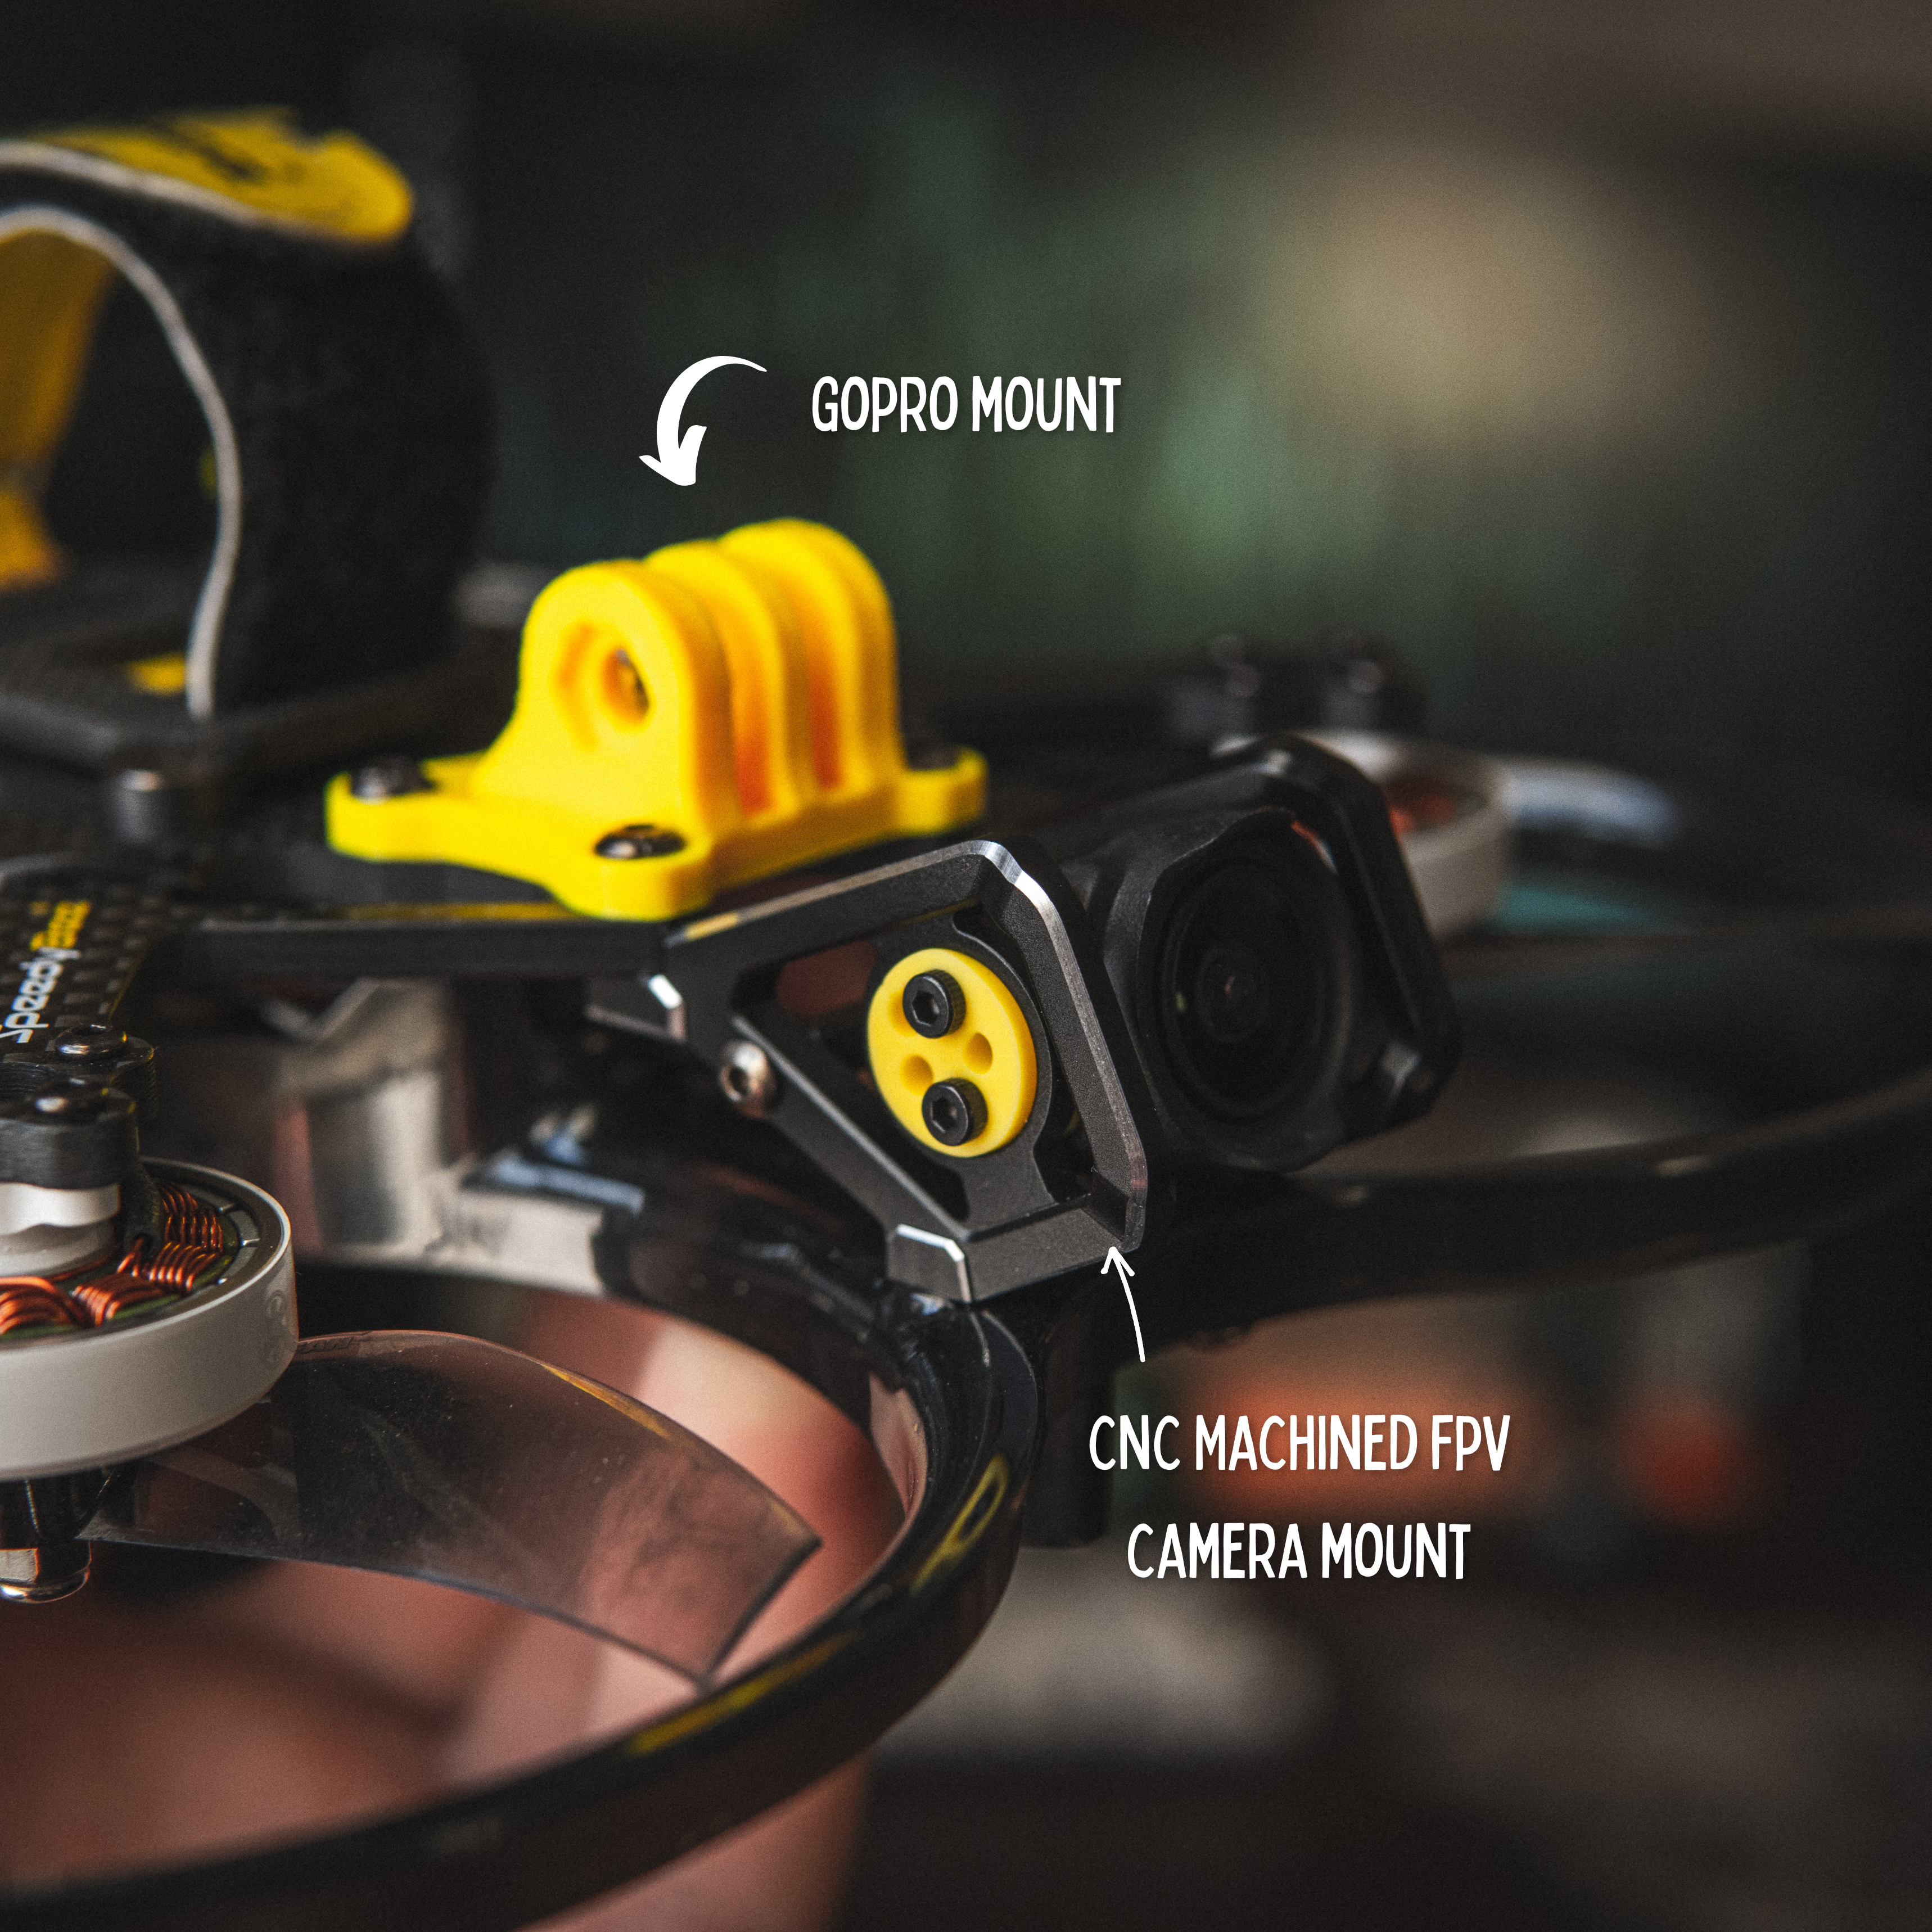
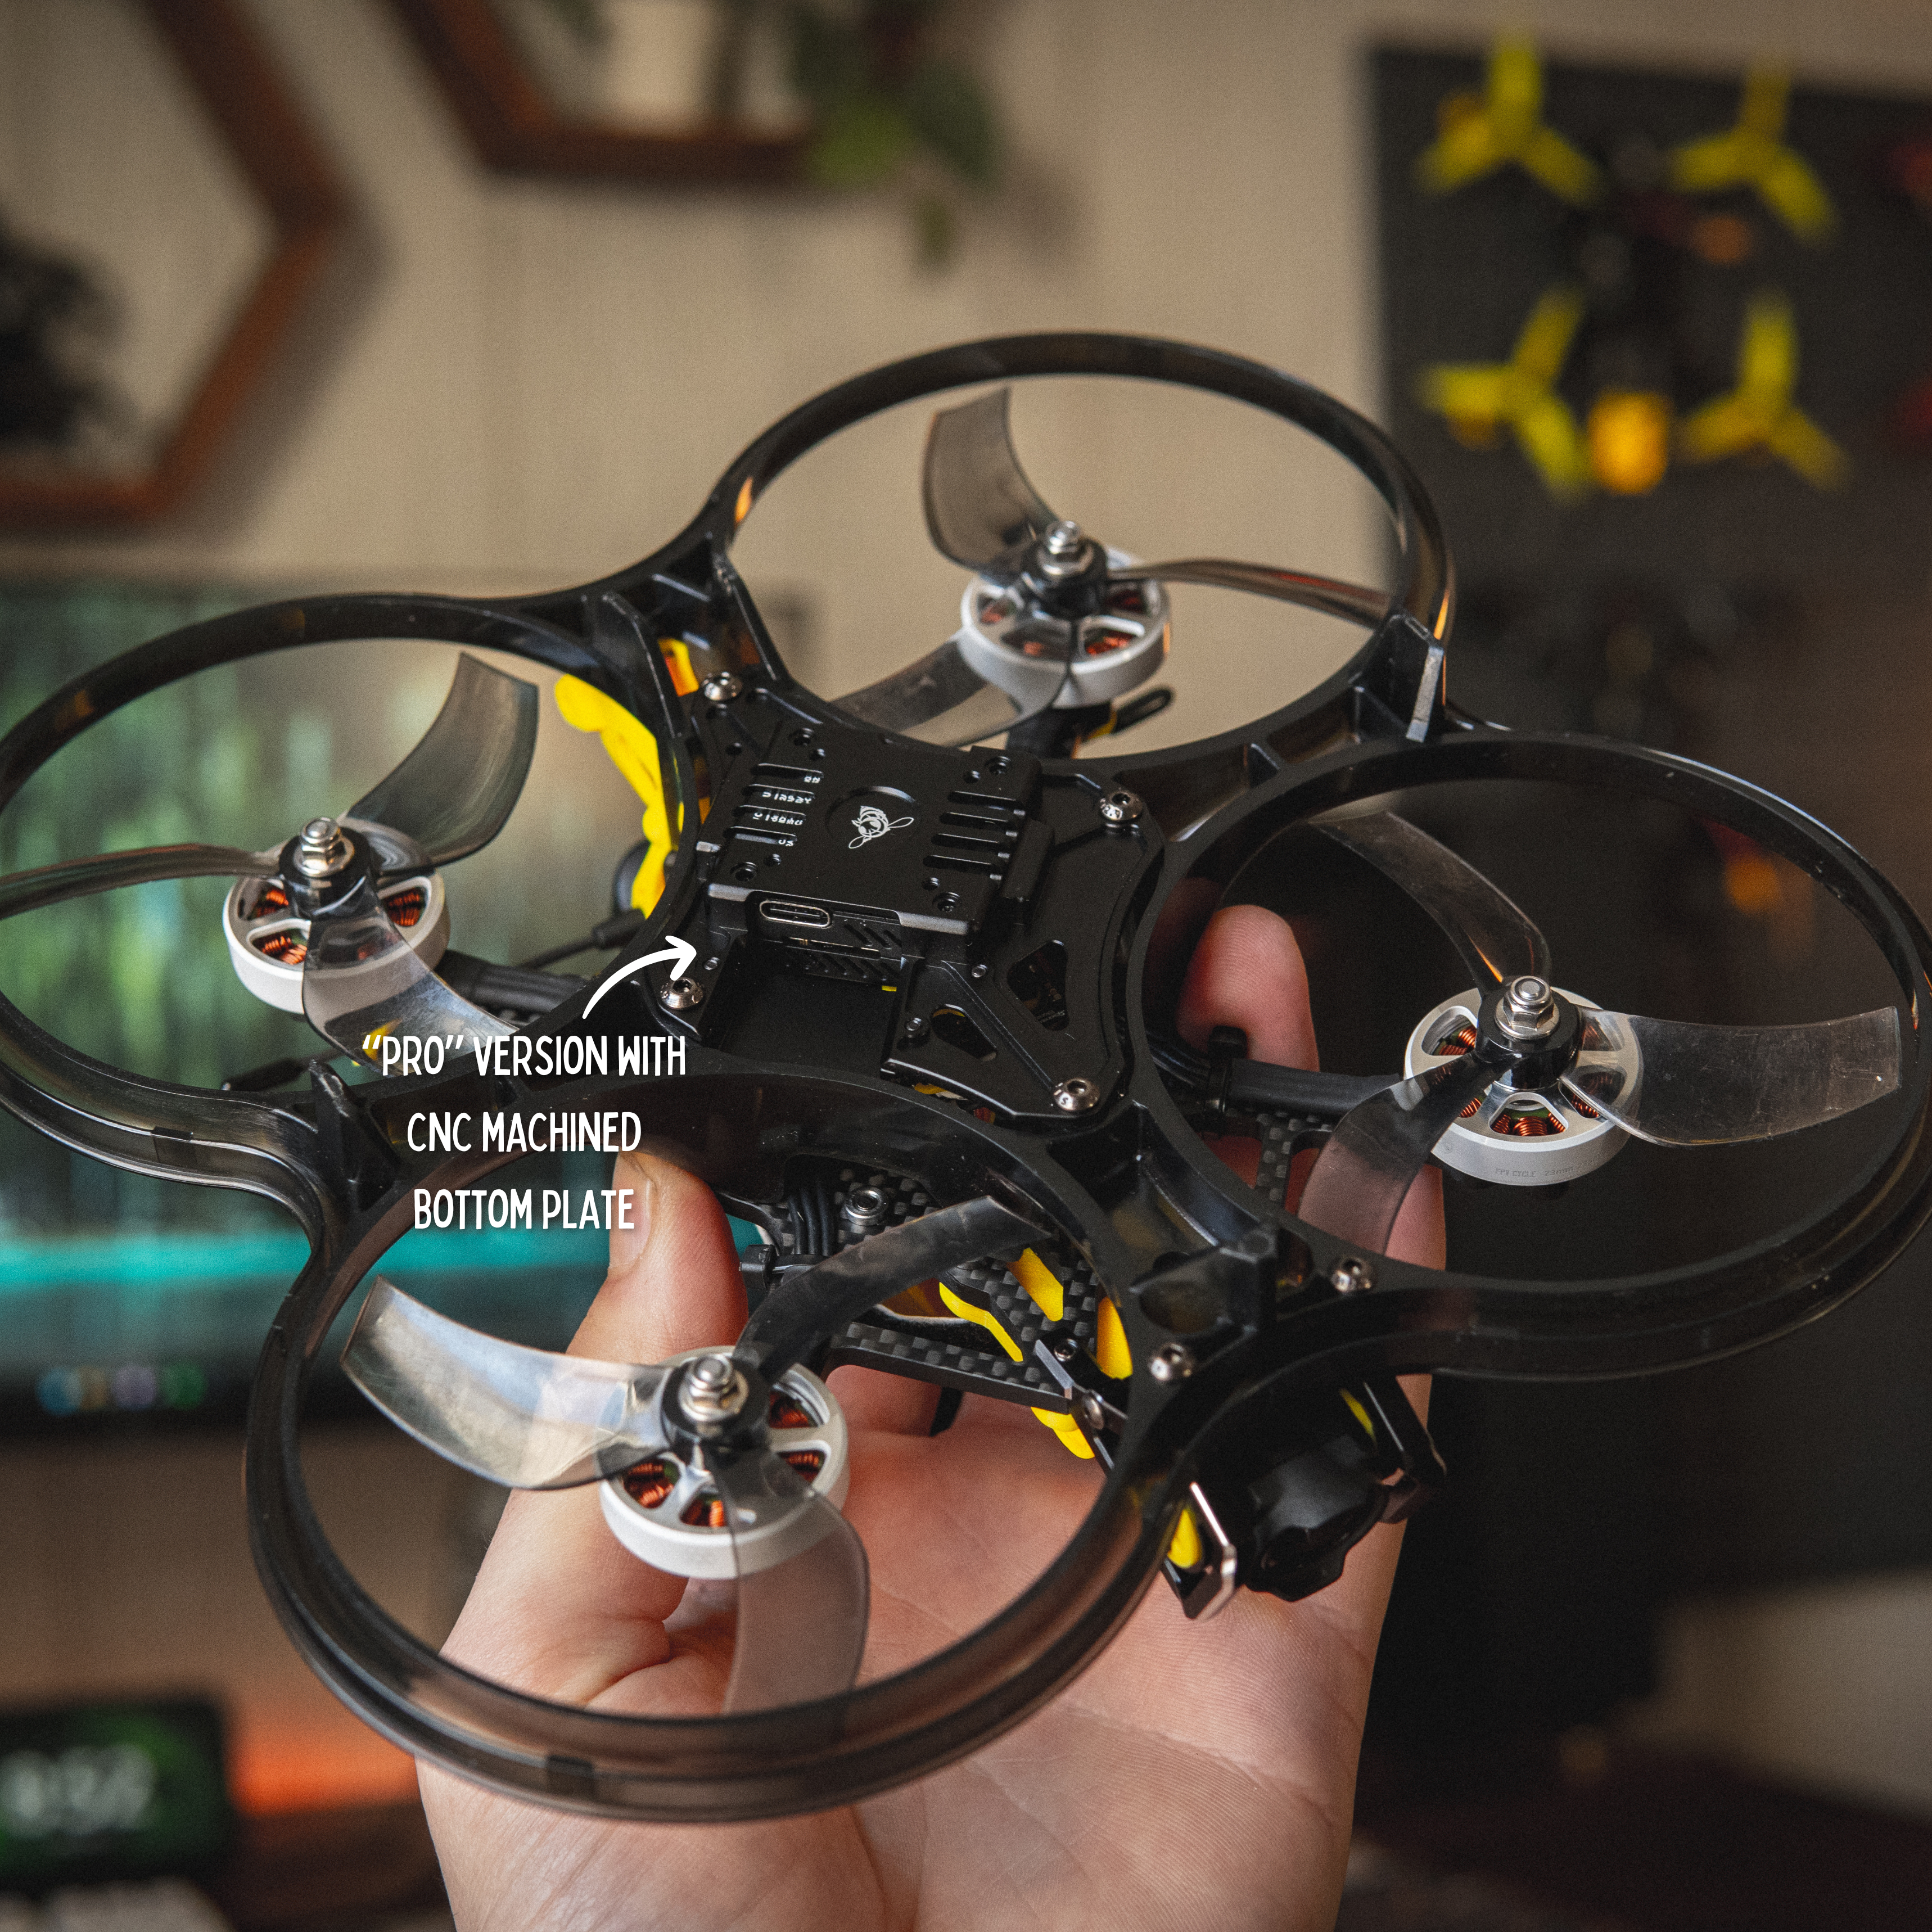
Right off the bat you can tell everything about this frame is high quality. The carbon fiber is cut extremely well with no sharp edges. The plastic prop guards/ducts feel sturdy with enough flex in them to withstand some abuse without immediately cracking. Even the 3D printed TPU parts look and feel surprisingly good for 3D printed parts. However, the real star of the show is the CNC machined camera mount, and if you got the “Pro” version to use an 03 Air Unit, the CNC Machined bottom plate. All together the kit feels shockingly premium for something that only costs $35.99, or $39.99 for the “Pro” version.

One of my favorite design features of this frame is how it reroutes the flight controllers USB port to the back of the frame. Because the flight controller is completely surrounded there’s no direct access to the USB port on the flight controller. Usually this would be a huge issue and make any betaflight configurations an absolute nightmare requiring you to tear apart the frame in order to access it. Clearly SpeedyBee realized this and thoughtfully included 2 USB extension cables (1 USB-C to USB-C and 1 Micro USB to USB-C) that reroute the connection to the back of the frame perfectly enclosed by an included 3D print. It’s a small detail, but one that saved me from wanting to pull out my hair during configuration.
Included with the frame is an optional 3D printed GPS mount, I didn’t end up using a GPS in my build, but it’s a nice inclusion for those who want to set up GPS functions such as return to home in either Betaflight or iNav.
Not Included is the “Bee35 Removable Gimbal”. It’s an optional vibration damper you can pick up from the SpeedyBee website for an additional $5.99. This in theory should help capture smoother footage by isolating the GoPro from the rest of the frame. I didn’t end up using one for this build and so far haven’t noticed any vibrations that would cause issues with the GoPro footage, however it’s not a bad idea to pick one up just in case. I really wish SpeedyBee would have just included this part with the frame.
Assembly and Compatibility
Assembly for this frame is….strange to say the least. SpeedyBee does a great job with instructions showing how to get everything put together, but if you’ve never built an FPV drone before, you might find yourself getting a bit confused unless you’re following a tutorial. Unlike typical quads where you have a bottom plate that houses all the components and a top plate to secure everything, the Bee35 is almost built upside down in comparison. Well, it is built upside down, not only is it a “pusher” style quad meaning the motors are facing down instead of up, but the whole flight controller and ESC stack gets installed upside down. Now, there’s nothing wrong with doing this and I’m fairly certain other cinewhoop frames like the Cinelog 35v2 work the same way. It just adds an extra step in betaflight to reprogram the flight controller’s orientation and I thought it was worth mentioning.
There are two versions of this frame, the “Bee35” and the “Bee35 Pro” As far as I can tell the only difference between the two is the bottom plate. The regular Bee35 comes with a carbon fiber bottom plate, whereas the “Pro” version comes with an aluminum CNC Machined bottom plate specifically designed for the DJI 03 Air Unit. So long story short, if you’re planning on using an 03 Air Unit, get the “Pro” version, for everything else, the normal version will work just fine.
One to note is that if you plan on using an 03 Air unit, a full sized 30x30 flight controller and ESC stack will NOT fit. I did a test fit with the SpeedyBee F7v3 and it was a few mm too tall. I ended up using a F405 Mini stack, but even that was a bit of a squeeze. I’d highly recommend looking at using an AIO board like the T-Motor F7 AIO or the GepRC F722 AIO. You might run into issues if you use anything larger than a 20x20 stack.
Performance
This thing flies like a dream. I was honestly shocked the first time I flew it. In comparison to how floaty and underpowered my Shendrones Squirt v2 was, the Bee35 is a joy to fly. Because of its low profile prop guards the wind doesn’t push it around nearly as much and it feels rock solid. On top of that it has plenty of power, more than enough for typical Cinewhoop flying. I can even do some light freestyle with it, although I don’t necessarily recommend it.
As far as flight times go, I’m also really impressed. For each of my flights I was using 1200mAh 6s batteries from Tattu. Depending on the wind, and how aggressive I'm flying, I can push anywhere from 7 minutes, to my longest flight being around the 10 minute mark. Flight times with FPV drones are usually on the short side of 4-6 minutes, so I was really happy to see how long the Bee35 could stay in the air. Flight time is especially valuable on Cinewhoops where you’re often doing one continuous shot.
A New Favorite
The Bee35 is currently my favorite frame for 3.5 inch Cinewhoops. The components are high quality, it’s lightweight, durable, performs well, and in my opinion looks really sharp. I do wish they just included the GoPro vibration damper by default, instead of charging an additional $6 for it, but that’s really my only gripe at the moment. It does have a few quirks like not being able to use a 30x30 stack with the 03 Air Unit, but overall it’s a great package for the asking price of $39.99.
Learn More